
Heat Treatment Performance And Prevention Of Mold Failure
In the previous section, we explained the process of mold heat treatment. In this section, we share some standards for mold heat treatment.
We all know that mold heat treatment is a very critical factor in ensuring mold quality. The most important parameters in heat treatment are austenitization and cooling rate. The cooling rate must be tightly controlled to reduce the risk of deformation and cracking while obtaining optimal metallurgical properties.
1.Heat Treatment
Furnace for heat treatment
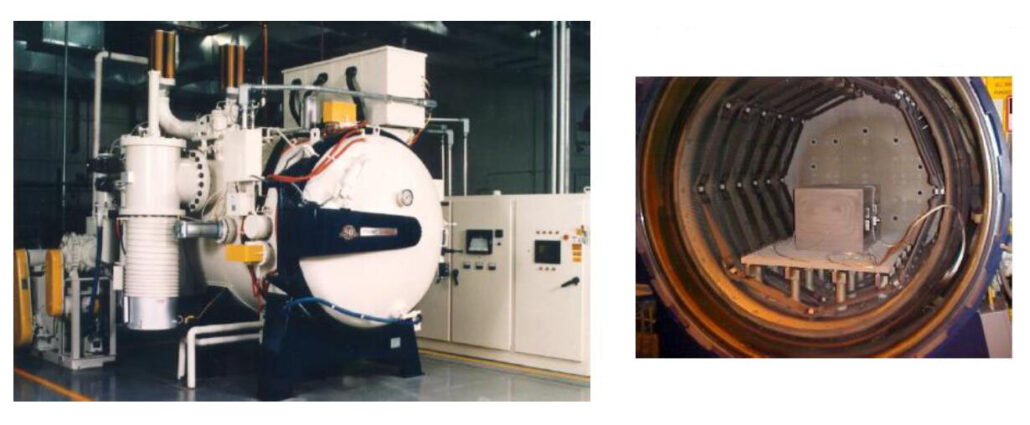
- The vacuum furnace used for heat treatment needs to have sufficient cooling capacity. Cool a mold with a surface temperature of 1885°F (1030°C) at a minimum cooling rate of 50°F/min (28°C/min).
- The furnace needs to have thermocouples to control multiple loads through a programmable controller.
- During the quenching process, thermocouples on the mold surface and core, in the process of heating the mold, make the mold surface and center have the ability to maintain isothermal temperature.
The surface thermocouple (Ts) hole should be centered on the largest area at the rear of the mold.
Use the existing cooling holes to place the core thermocouple (Tc) as close to the center of the block as possible.
Time of heat treatment
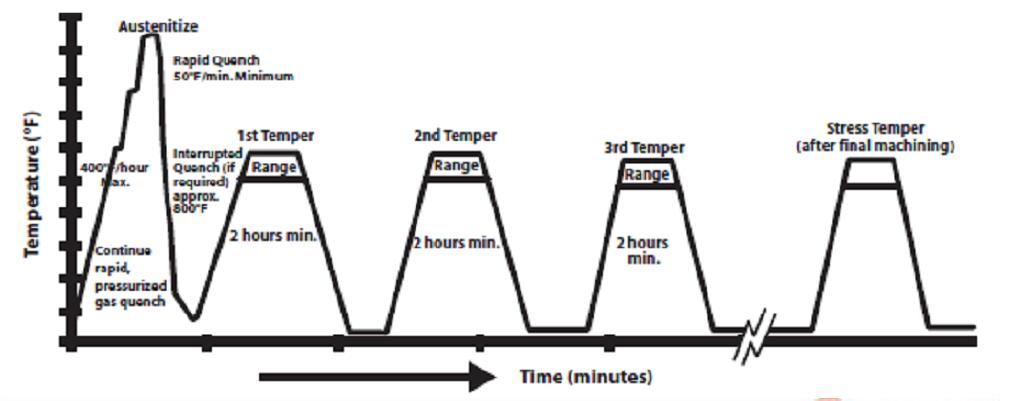
The general steps of the heat treatment process:
- Preheating: Load the workpiece into a furnace at room temperature and heat up at a rate of ≤400°F/h (220°C/h)
- Heat the oven to 1000°F to 1250°F (540°C to 675°C) and keep
- Heat the oven to 1550°F ± 50°F (845°C ± 10°C) and keep
- When the furnace temperature reaches the austenitizing temperature: 1885°F (1030°C), hold the temperature for 30-90 minutes
- During quenching, the furnace cooling rate is 50°F/min (28°C/min)
- Tempering: Tempering twice or three times to make the mold hardness in the range of 44~46HRC.
Hardness
- The recommended hardness range is HRC42-50. The lower end of the hardness range is recommended for molds with severe cracking, while the upper limit is recommended for molds with improved thermal crack resistance.
- The specific hardness range must be specified by the customer and is called the 3-point range; for example, HRC 44-46.
- The latest version of ASTM E10, E18, A956 or E384 should be followed in hardness testing
- Hardness readings should be taken at least 5 points on the mold, 5 points can be the four corners and the center surface
- Inform the customer of any deviation from the specified hardness range.
Furnace Data
- The heat treatment plant shall retain copies of the furnace map data and copies reflecting the actual loads for at least 7 years.
- Recorded furnace map data for thermally cycled workpieces, including preheating steps, austenitization, and quenching temperature to Tc < 300°F (150°C), shall be presented in an unambiguous manner
- The minimum cooling rate is 50°F/min (28°C/min) over the temperature range of 1885°F to 1000°F (1030°C to 540°C) as measured by Ts.
Hardened Microstructure

Microstructural examinations were performed on test pieces representing quench details.
- The test pieces are collected from:
- the corners or edges of the quenched workpiece
- the sample block attached to the workpiece during the whole quenching process.
- Specimens were prepared in accordance with ASTM E3 and etched with 5% nitric acid alcohol solution.
- The main component of the quenched microstructure of the test piece is tempered martensite with some inclusions of bainite.
- There should be no pearlite, retained austenite, decarburization, carburization, or excessive inter-particle precipitates.
Charpy V-type Impact Toughness Test
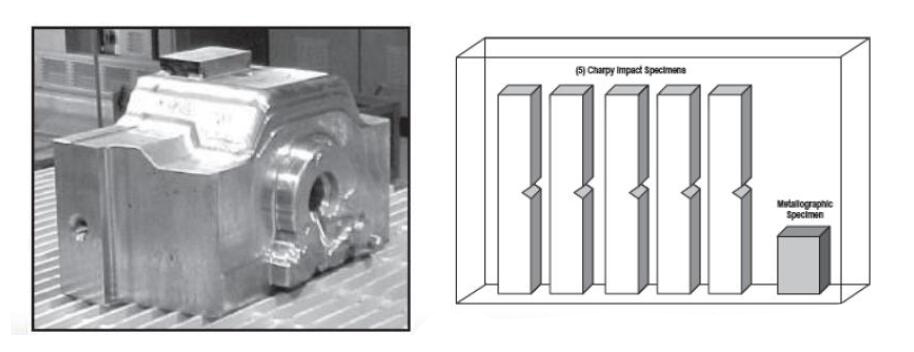
- Take samples before heat treatment
- The sample should be placed in the furnace with the workpiece and accompany the entire quenching process, including preheating, austenitizing, quenching, first tempering.
- Remove the sample after the first tempering, temper it separately, and temper it to 44~46HRC.
- Specimens shall be Charpy impact tested in accordance with ASTM A 370 to 5 dimensions l0mm x l0mm.
- Remove the highest and lowest values, and among the remaining values, take the minimum and average values, and record them.
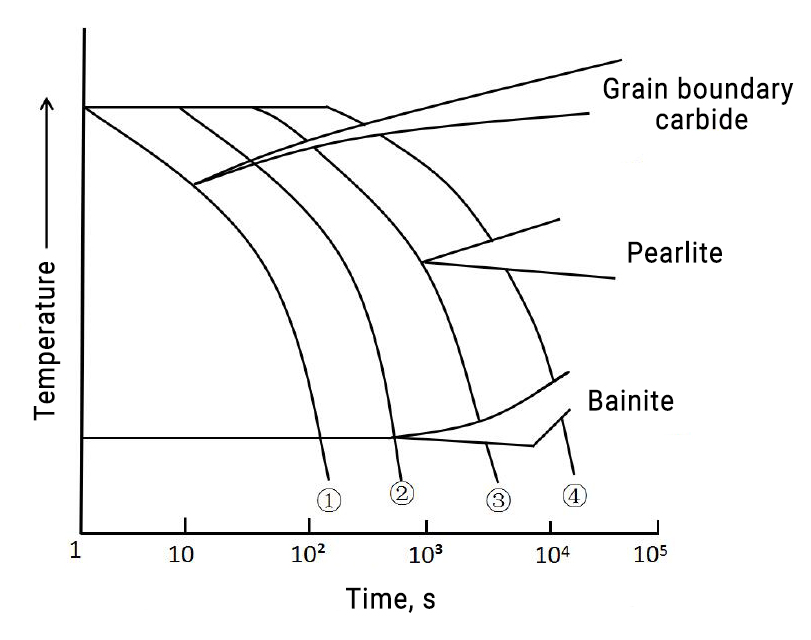
Austenitizing temperature
The temperature of austenitization is usually between 1010° and 1050°, and the temperature is usually chosen to be 1030°.
- 1885°F (1030°C) provides better carbide decomposition (better resistance to hot cracking) and tempering stability than lower temperatures. And it is conducive to grain growth.
- The austenitizing temperature of 1030°, the mold has better thermal fatigue resistance, high hardness, better thermal fatigue resistance but reduced toughness.
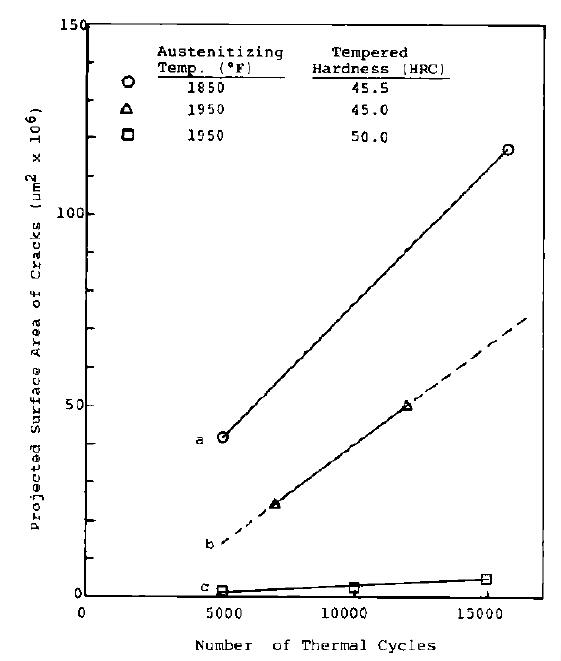
Cooling rate for quenching
A quenching rate of 50°F/Min (28°C/min) must be guaranteed to ensure major martensitic transformation and better properties. But too fast comes with risks (high stress, easier deformation, etc.)
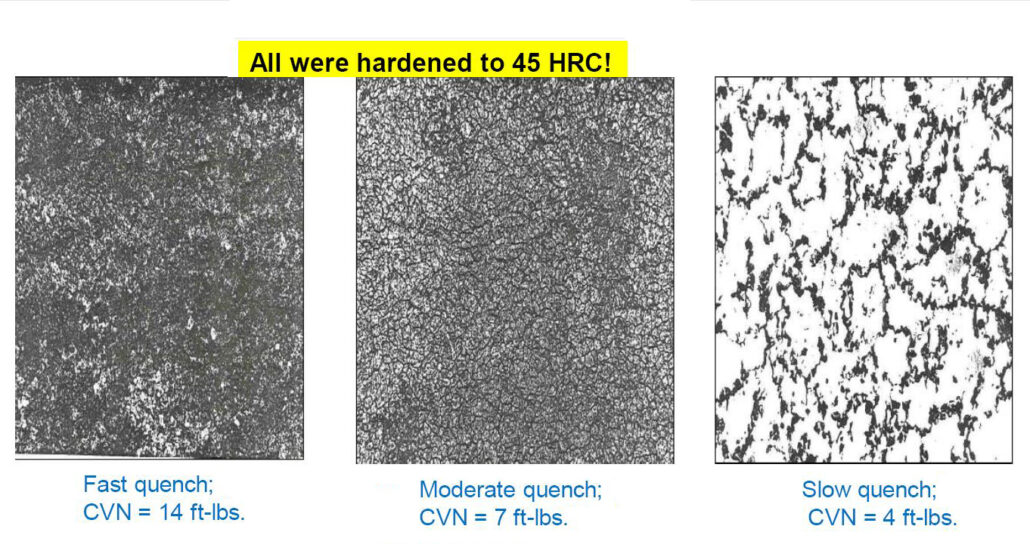
When the quenching rate is above 50°F/Min (28°C/min), the hardness obtained by heat treatment is 45HRC, but their impact toughness is very different. In the picture on the left, the impact toughness can reach 14, and the impact toughness in the picture on the right is only 4.
When the quench rate is too high, it can cause die cracking
2 or 3 temperings required (Temper)
The first tempering: get martensite structure, reduce the brittleness of the workpiece and improve the toughness
The second tempering: adjust the workpiece to obtain the required hardness;
The third tempering: completely eliminate the stress generated by the previous process.
So 2 or 3 temperings can ensure the stability of the mold dimensions and obtain the correct microstructure.
Heat Treatment Certificate
We can ask the heat treatment supplier for a certificate of conformity for reliable after-sales service.
2.Prevent Mold Failure
Twenty-five years ago, catastrophic failure of molds was a common occurrence. But with the advancement of various processes, better steel, and more stable heat treatment, the frequency of mold failure has been reduced, and the life of the mold has been significantly improved. In some cases, we can even achieve higher toughness and harder side-by-side without adding the additional risk of failure.
So what measures do we take to prevent or delay the failure before the mold fails?
Gross Cracking
The die-casting process tests the overall cracking resistance of the mold from the very beginning.
- Preheat the mold to 300°F (150°) before starting the die casting to minimize thermal shock at start of the die casting. The oil heating mold is preferred, and the radiation heating mold can also be used.
- Sometimes the operator forgets to turn on the cooling water of the mold at the beginning and turns on the cooling water directly when he realizes it. This may generate a relatively large thermal shock and cause mold cracking.
Thermal Fatigue Cracking
This is a slow and certain process. We can only consider how to slow down this process:
- Minimize the spraying amount of the release machine as much as possible; enough release agent deposition is enough
- Control the consistency of the die casting process and maintain a stable thermal balance of the mold
- After the mold sticks to aluminum, the aluminum will be melted with flame, which will cause the mold temperature to be higher than the tempering temperature and cause the mold core to anneal, reducing the mold’s ability to resist thermal cracking
Erosion, Washout & Solder
These influences on mold life are mainly determined by product design, mold design, and die casting process parameters. Note the following:
- Is the gate speed within a reasonable range? High-speed control, pay attention to the ratio of punch to the gate area.
- Whether there is a focus on spraying to take care of the position that is easy to stick to the mold
- Can a qualified product be produced at a lower gate speed?
- Is there a more reasonable gate location (or increase the gate length) to improve filling or reduce gate speed?
- Was the alloy completely melted during production?
Mechanical Damage
In terms of mechanical damage, you need to consider the following:
- For the flash of the parting surface and the slider, it is necessary to establish monitoring measures gradually.
- If the biscuit bursts open, the molten metal will adhere to the parting surface and the guidepost, resulting in a larger flash or flying material
- If you need to clean the mold, use a softer tool (such as brass) to avoid bumping the mold
- There are products in the mold that are not allowed to close the mold